Monday, August 15, 2016
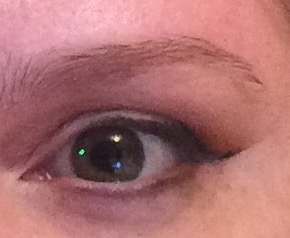
EOTD: Sparkly Purple Eyes
This is what I did:
1. Frosty, pink on my lid
2. Frosty, eggplant on my crease and outer lid. I blended it, so there were no harsh lines.
3. I mixed the pink and the eggplant, and put it on my lower lash line.
4. Glittery mauve I patted on the lid for the glitter effect.
Saturday, August 13, 2016
EOTD: Inspired by the Modern Renaissance Palette
If you're like me, and you like watching makeup videos on Youtube, you will have seen the millions of videos using the Anastasia of Beverly Hills Modern Renaissance Palette. I don't know if maybe they have been sent it for free, and they have some deal to use the palette on a video. Everyone is seemingly loving this palette. I don't know maybe I'm being too cynical. What I like about this palette is the colors are great for the fall time. Also, they look pretty on redheads, on my complexion with my freckles and hair. It just goes really well. I feel like matte eyes, matte blush, and matte lips are so popular right now. And glowing to the moon highlight. The only thing to be glowing is the highlight.
I don't have the palette, and I don't plan on buying it because I have way too much makeup. Too many palettes. I don't need to buy any more makeup for the rest of my life. This look was just using colors I already have to duplicate the same colors that are in that palette.
Here is what I did. It was really easy.
1. Matte, medium brown in the crease, with a fluffy brush, and on the lower lash line. It's ok if it is messy, you can clean it up at the end. Also, make sure you put eye primer on the lower lash line, so the colors will come out more. I love the Milani Eye Primer. You can get it at the drugstore.
2. Matte, medium orange in the crease, and lower lash line
3. Matte, brick color in the crease, and lower lash line.
4. Matte, copper in the outer v, outer lid, outer crease, and outer lower lash line.
5. Matte, dark brown on a fluffy brush on the outer lid and outer crease
6. Now blend everything out, so there are no harsh lines anywhere.
7. For the lid, use a warm, medium-dark brown, with a pearled finish.
8. Black eye liner in my waterline
9. Matte, light cream color under my eye brow.
10. Blend the highlight color with the crease color.
11. I used eye makeup remover to clean up under the eye, and make it look neater under there.
12. Last, I used a golden highlight for my inner corners. My favorite highlighter is The Balm's Mary Lou Manizer.
Friday, August 12, 2016
EOTD: Smoky Green Eyes
These are the steps I took to make this eye look.
1. Matte, peach on and above my crease with a fluffy brush.
2. Frosty, peach shade on the inner corner of my eye. All around my tear duct, and the inner 1/3 of the eye.
3. Sparkly, medium yellow green in the middle of the lid, blended into the frosty peach shade.
4. Sparkling, forest green shadow in the outer 1/3 of the lid. I blended out all harsh lines in between the three colors and above the crease.
5. Frosty, dark green, almost teal color in the outer crease and above the crease. I blended this out with a big fluffy brush.
6. I put the same dark green on my lower lash line.
7. I first used a black eye liner to go on my upper lash line, but I didn't like the way it looked. I wanted to smoke it out, but I wasn't able to do that very well with the liner I used. I recommend using a matte black shadow because it would be able to blend out easier. I put it on the outer, upper lash line.
8. Black eye liner on waterline.
9. Black/brown mascara on the top lashes.
Thursday, August 11, 2016
EOTD: Sparkly Brown Eyes
1. I put a frosty, metallic, bronzy brown all over my lid.
2. Matte, warm, medium brown in the crease. I blended out the lid shade with that color. Then because I have slightly hooded eyes, I brought the brown higher than my crease and blended it up.
3. I tried something new on this step. I took a dark, matte, cool toned brown and on the lower lash line but it on the outer third. Then, I swept it up at an angle. The same direction my lower lash line goes if it were to extend more. Then I connected it up with my crease. I filled in the outer v I created on the outer part of my lid. I blended it into the lid and above the crease so I had no harsh lines.
4. I put a bright, sparkly, golden peach shade on my tear ducts and under my brows.
5. I also put a dab of a warm, champagne, frosty, metallic shade on the tear ducts, and just the arch of the eyebrows.
The sparkly shadows didn't look overdone at all. I think it made the look more interesting, rather than a normal brown eye. It just made it look a little more pretty in my opinion.
6. My favorite part of this look was the shimmery, warm copper I put in the center of the lid. You can get this at the drugstore. It is L'Oreal Infallible Eye Shadow in Amber Rush. It is one of my all-time favorite eye shadows.
7. I tight lined my upper and lower waterlines with a black eye liner. I used Jordana 12 Hr. Made to Last Liquid Eye Liner Pencil in Black Point. This goes on well on my waterlines. It is also available at the drugstore.
8. For the final step, I put a rose gold eye liner on my upper and lower lash line. NYX makes a pretty rose gold liner.
Tuesday, August 9, 2016
Tropical Beach Eyes
I thought this eye look would be fun for the summertime. Some people may not like too much color on the eye, but I feel like this is everyday appropriate. The colors reminded me of a tropical beach with the sand and the turquoise water.
This is what I did.
1. Cream, matte shadow from lashes to brow. Wet 'n Wild Brûlée would work great for this.
2. Muted, matte peach in the crease.
3. Light, dusty rose, matte on the outer lid and outer crease.
4. Light-medium peach with gold shimmer on the lid. I wetted my brush, so it would get more pigment. I sprayed Elf Makeup Mist & Spray on my brush, and that worked well.
5. Medium, brown shimmer on the outer lid and outer crease.
6. Aqua-blue with a golden sheen in the inner tear duct, a little bit in the inner lid, and all along the lower lash line.
7. Blue-teal, frosted, a little darker than the aqua blue on the outer lower lash line.
8. Lastly, I took a black shadow, and lined very close to my upper lash line.
I think it turned out really pretty. I don't always like the way turquoise looks on my eye, but this I think came out looking good.
This is what I did.
1. Cream, matte shadow from lashes to brow. Wet 'n Wild Brûlée would work great for this.
2. Muted, matte peach in the crease.
3. Light, dusty rose, matte on the outer lid and outer crease.
4. Light-medium peach with gold shimmer on the lid. I wetted my brush, so it would get more pigment. I sprayed Elf Makeup Mist & Spray on my brush, and that worked well.
5. Medium, brown shimmer on the outer lid and outer crease.
6. Aqua-blue with a golden sheen in the inner tear duct, a little bit in the inner lid, and all along the lower lash line.
7. Blue-teal, frosted, a little darker than the aqua blue on the outer lower lash line.
8. Lastly, I took a black shadow, and lined very close to my upper lash line.
I think it turned out really pretty. I don't always like the way turquoise looks on my eye, but this I think came out looking good.
Winged Warm Matte Eyes
Here is another eye look for you. This time I used tape, and focused color on the edged for a winged look. I have trouble doing wings. I used a matte black shadow because it is more forgiving than gel or liquid.
Here is what I did:
1. I slanted tape from my lower lash line to an angle.
2. I put a matte medium brown with a fluffy brush from my crease to half way up between my crease and eyebrow.
3. Then I put a matte medium-dark brown with the same brush close to the tape and into the crease.
4. I took a clean, fluffy brush, and blended everything out.
5. Matte, medium-dark copper brown on a small blending brush a little bit on the outer lid, and into the crease.
6. Satin, light warm, beige with a flat shade brush on my lid.
7. Then I took the medium-dark copper brown color on the outer v.
8. After that I took a matte, dark brown on the outer corner of my lid with a pencil brush.
9. I took the medium-dark copper brown color again and put it in between the dark brown color and the light beige on the lid.
10. I blended it in a little with my finger, so no harsh lines between the brown and cream on the lid.
11. I took the tape off.
12. I took a matte black shadow and an angled liner brush. I put in on my upper lash line and follow the angle that was created when I used the tape. Then, I made a triangle from the line to lash line.
13. I put the dark brown close to my lower lash line.
14. Last, I put a white matte on my inner corner.
This was fun to do. I hope everything is well with you, and you enjoy putting on your makeup.
Here is what I did:
1. I slanted tape from my lower lash line to an angle.
2. I put a matte medium brown with a fluffy brush from my crease to half way up between my crease and eyebrow.
3. Then I put a matte medium-dark brown with the same brush close to the tape and into the crease.
4. I took a clean, fluffy brush, and blended everything out.
5. Matte, medium-dark copper brown on a small blending brush a little bit on the outer lid, and into the crease.
6. Satin, light warm, beige with a flat shade brush on my lid.
7. Then I took the medium-dark copper brown color on the outer v.
8. After that I took a matte, dark brown on the outer corner of my lid with a pencil brush.
9. I took the medium-dark copper brown color again and put it in between the dark brown color and the light beige on the lid.
10. I blended it in a little with my finger, so no harsh lines between the brown and cream on the lid.
11. I took the tape off.
12. I took a matte black shadow and an angled liner brush. I put in on my upper lash line and follow the angle that was created when I used the tape. Then, I made a triangle from the line to lash line.
13. I put the dark brown close to my lower lash line.
14. Last, I put a white matte on my inner corner.
This was fun to do. I hope everything is well with you, and you enjoy putting on your makeup.
Monday, August 8, 2016
Eye of the Day: Everyday Warm Neutral
I want to show you my eye look for today. I think it looks pretty, and it was easy to do.
I am inexperienced with taking pictures and editing them, so I'm sorry they look blurry. Also, I'm not sure what that little white dot is under that picture or how to get rid of it.
Here is what I did:
1. Using a blending brush, I applied a matte, medium orange color from my crease to half way in between my crease and eyebrow. I didn't want it to touch my eye brown, but I have slightly hooded eyes, so I wanted the color to be seen when I opened my eyes.
2. Then, with the same brush, I applied a matte, medium-dark copper brown, that is close to the same color as the first, only darker. I put this on the crease more precisely, and I let the first color peak through at the top.
3. Next, I took a flat-shader brush, and applied a medium metallic copper on my lid, below the crease.
4. After that, I took a pencil brush, and put a matte burgundy color in the outer corner of my eye. I just have a little space there, so I only put a little bit. Just to darken it up.
5. Then, I took a clean, fluffy brush, and made sure all the edges of the eye shadow were blended out.
6. I used the same fluffy brush, and applied a satin, light, warm beige color under the arch of my eyebrow. I also put it around my tear duct.
7. Next, I used the flat eye shadow brush I used to apply the lid color, and I applied the first, medium orange color, on my lower lash line. I used a bigger brush, so it would apply a bigger amount on the lower lash line.
8. Then, I used a liner brush and applied the second color I used, the medium-dark copper brown right along the lower lash line. This is more precise, and thin compared to the first shade I put on the lower lash line.
9. After that, I took a clean fluffy brush and made sure the edges of the lower lash line color were all blended out.
10. I used the liner brush to apply a matte back shadow on the outer half of the upper lash line.
11. Using the pencil brush, I put the matte burgundy color close to the lower lash line.
I liked this look, so I thought I would share it with you, and describe how I did it. You could create the same look using the eye shadows you already have.
Subscribe to:
Posts (Atom)